We’re excited to announce that the Lumar MCP (Model Context Protocol) server has officially launched, connecting your AI assistant directly to your Lumar data.
From crawl reports to AI Visibility scores, your Lumar projects are home to valuable website intelligence. MCP makes that information easier to explore, letting you ask questions in plain English and get clear answers directly from it — without switching tabs or copying data into a separate chat window.
This means less time pulling information together manually, and more time understanding what needs attention and deciding what to do next.
Here are seven (quick) ways to get started:
7 things MCP lets you do in minutes, not hours
1. Run an automated crawl audit
Working through reports tab by tab takes time.
With MCP, you can ask your AI assistant to audit your latest crawl. It can pull your health score, rank your biggest issues by volume, and compare what’s changed since last time — all in one reply.
AI retrieval systems don’t just reward semantic relevance—they reward structured relevance and logical reasoning pathways.
“Audit the latest crawl for [project]. What are the top issues and what got worse?”
2. Do your analysis in plain English
Finding the data you need often means building filters, writing queries, or exporting data for further analysis.
Simply ask for what you need in plain English. Your assistant can filter and analyze any crawl summary or Lumar report directly inside the LLM environment you already work in.
“Show me every page over 3 seconds load time with a word count under 300, grouped by template.”
3. Speed through admin and project setup
Segments, tasks, and custom metrics often mean clicking through forms. Chain them together, and you’re navigating multiple parts of the platform.
Instead, describe the outcome you want and let your assistant handle the process.
For example, you might want to create a custom metric that identifies a page template on your site, then build a segment based on that metric.
Previously, this was a two-stage job across two parts of the platform. Now, it becomes one request:
“Create a custom metric that detects product detail pages, then build a segment from it so I can track that template separately.”
The same goes for one-off admin: trigger crawls, create remediation tasks, link issues to Jira, or manage project segments in a single sentence.
4. Cover every project at once
Managing multiple sites or clients? Ask once and get a clear view across all of them.
See which projects need your attention, how performance is changing over time, and whether crawls are running as expected. You can also prepare for your next stand-up or client check-in without manually pulling updates from each project.
“Give me a one-line health summary for each of my projects, and flag anything that dropped this week.”
5. Manage your AI Visibility
As AI search continues to evolve, understanding where your brand appears in AI-generated answers is becoming increasingly important.
Make it a weekly habit. Ask your assistant how your AI Visibility has changed, review your latest prompt results, and understand how your topics and providers are performing.
You’ll also get to see where your competitors are gaining ground:
“What changed in our AI Visibility this week? Any drops or new competitors appearing?”
6. Connect Lumar data with your other tools
This is where it really comes together. MCP isn’t just for Lumar; it also lets you connect multiple services your teams rely on.
Connect them alongside Lumar, and your AI assistant can bring data and actions together in one conversation — reducing the need for exports, spreadsheets, and manual stitching.
Here are some more tools that pair well with Lumar:
- Google Search Console — match crawl issues to real impressions, clicks, and query data
- Google Analytics — weigh technical fixes against the traffic and conversions they affect
- Rank tracking tools (e.g. AccuRanker, SEMrush, Ahrefs) — connect ranking movement to the pages behind it
- Jira, Asana, or Linear — turn findings into tickets your dev team already works from
- Your CMS or data warehouse — cross-reference crawl data against content or business data
- Slack — post crawl summaries, receive alerts and post weekly wins to the channels your team already watches
Ask one question and let your assistant do the piecing together:
“Cross-reference the pages flagged as slow in my latest Lumar crawl with their Search Console clicks over the last 28 days. Which slow pages are costing me the most traffic?”
That’s the kind of prioritized analysis that usually takes hours to pull together, now available from a single question.
7. Brief senior stakeholders in business language, not SEO jargon
Your CMO does not want a list of canonical tags and redirect chains. They want to know what it means for traffic, revenue, and reputation.
Ask your assistant to blend your crawl data (SEO) with your AI Visibility scores (GEO, generative engine optimization) and write the update for you, in language a non-specialist can act on.
Try a prompt like:
“Pull my latest crawl health and my AI Visibility scores. Write a one-page update for our CMO: what is the business impact, where are we winning in AI search, and which topics are we not showing up for yet?”
In one reply you get a stakeholder-ready summary that:
- Leads with the business headline: site health and AI search presence framed against traffic and revenue, not metric codes
- Shows where GEO and SEO reinforce each other: the pages that both rank and earn citations in AI answers, and the technical issues putting that at risk
- Answers the question every leader asks, “what are we not addressing?” : the topics and queries where your brand is absent from AI answers, ranked by opportunity
- Ends with a short, plain-English next-steps list, with no SEO thinking required to read it
Add your Google Analytics or Search Console connector and the assistant can weight all of it by the traffic and revenue at stake, so the update lands with the people who hold the budget.
What is an MCP server?
MCP is an open standard that lets AI assistants like Claude, ChatGPT, Cursor, and others connect to external tools and data sources through a common interface.
By adding the Lumar MCP server to your AI assistant, you can ask questions, surface issues, and carry out actions without moving between tools.
MCP also lets you bring Lumar into connected workflows, combining Lumar data retrieval with actions like Jira ticket creation, Slack notifications, Google Search Console insights, and GitHub actions — all through one conversation.
The Lumar MCP server connects your AI assistant to two core areas of the platform:
Lumar Analyze — query crawl data, filter report rows, aggregate across dimensions, track health trends, manage tasks and segments, run exports and Single Page Requester jobs, and create custom metrics. Connect to Jira to raise issues straight from your findings.
Lumar AI Visibility — track visibility scores over time, see which topics and prompts drive citations, compare your brand against competitors in AI search, spot coverage gaps, and trigger fresh content-evaluation runs.
Setting up the Lumar MCP server
Setup takes about a minute. There are no API keys or config files to manage — add Lumar as a connector and log in.
What you’ll need
- A Lumar account
- An AI assistant that supports MCP connectors (Claude, ChatGPT, and others)
The three steps
- Add a new connector in your AI assistant. The exact name varies by platform — look for Connectors, Integrations, or MCP servers in your settings.
- Enter the Lumar server URL: https://mcp.lumar.io/mcp
- Log in when prompted. Your assistant opens a Lumar login window. Sign in to authenticate the connection, and you’re done — the Lumar tools are now available in your chat.
Because you log in with your own Lumar account, there’s nothing to copy, store, or rotate. Authentication is handled for you.
Step-by-step setup by platform
Claude (claude.ai)
Plans that support MCP connectors: Free, Pro, Max, Team, and Enterprise. Free users are limited to one custom connector.
On Free, Pro, or Max:
- Open claude.ai and go to Customize → Connectors.
- Click the + button and select Add custom connector.
- Enter a name (e.g. “Lumar”) and paste the server URL: https://mcp.lumar.io/mcp
- Click Add, then log in to your Lumar account when prompted to complete authentication.
On Team or Enterprise:
An Owner must add the connector once for the organisation before members can use it.
- Go to Organisation Settings → Connectors → Add → Custom → Web.
- Enter the name and URL: https://mcp.lumar.io/mcp
- Click Add, then authenticate with your Lumar account.
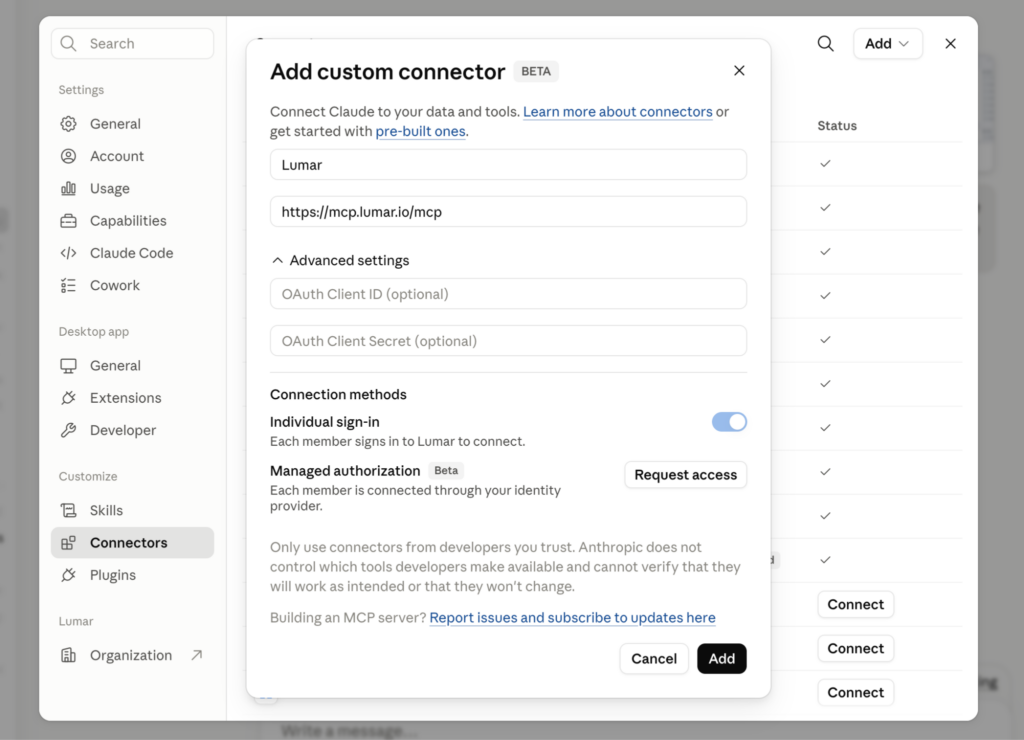
Once the Owner has added Lumar, each team member can connect their own account. Go to Customize → Connectors, find Lumar in the list, and sign in with your Lumar account.
ChatGPT
Plans that support MCP: Plus, Pro, Team, Business, Enterprise, and Education. Not available on the free plan.
Full write/action support (creating tasks, triggering crawls, managing segments) is available on Business, Enterprise, and Education plans. Plus and Pro users can connect and run read operations via Developer Mode, but write capabilities may be restricted.
Note: As of December 2025, ChatGPT renamed connectors to apps in their UI. If you see “Apps” where these instructions say “Connectors”, they’re the same thing.
- Go to Settings → Advanced → Developer Mode and enable it.
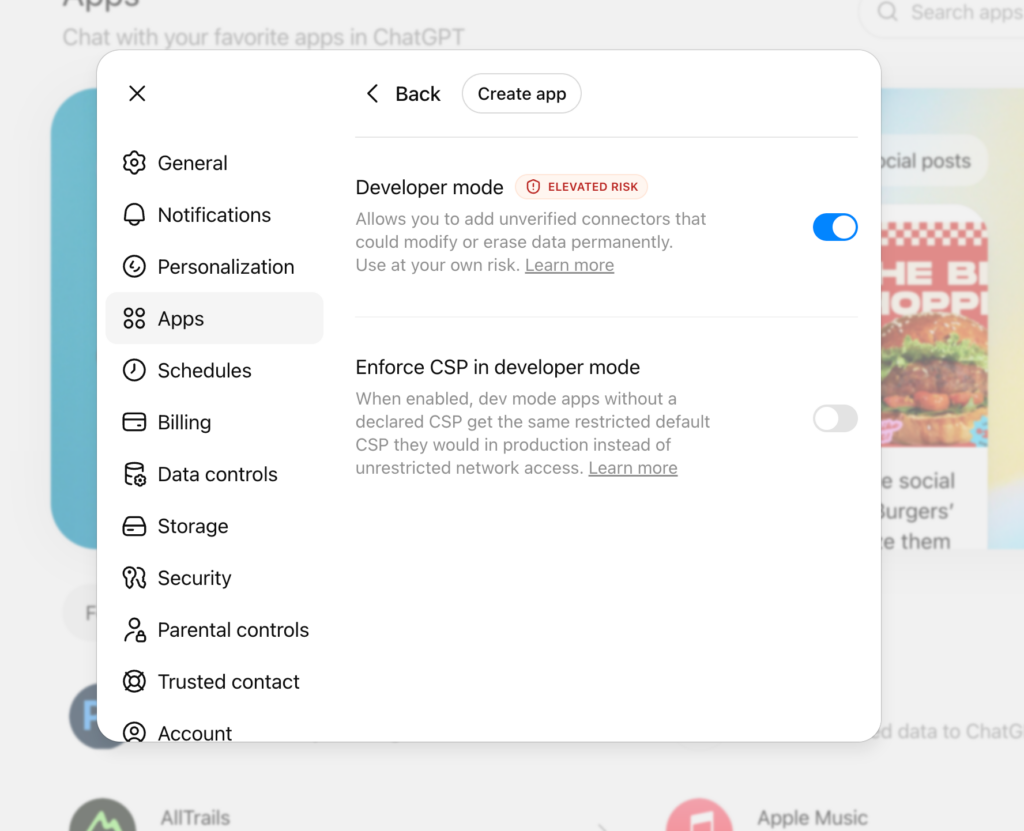
2. Go back to Settings → Advanced and click Create App
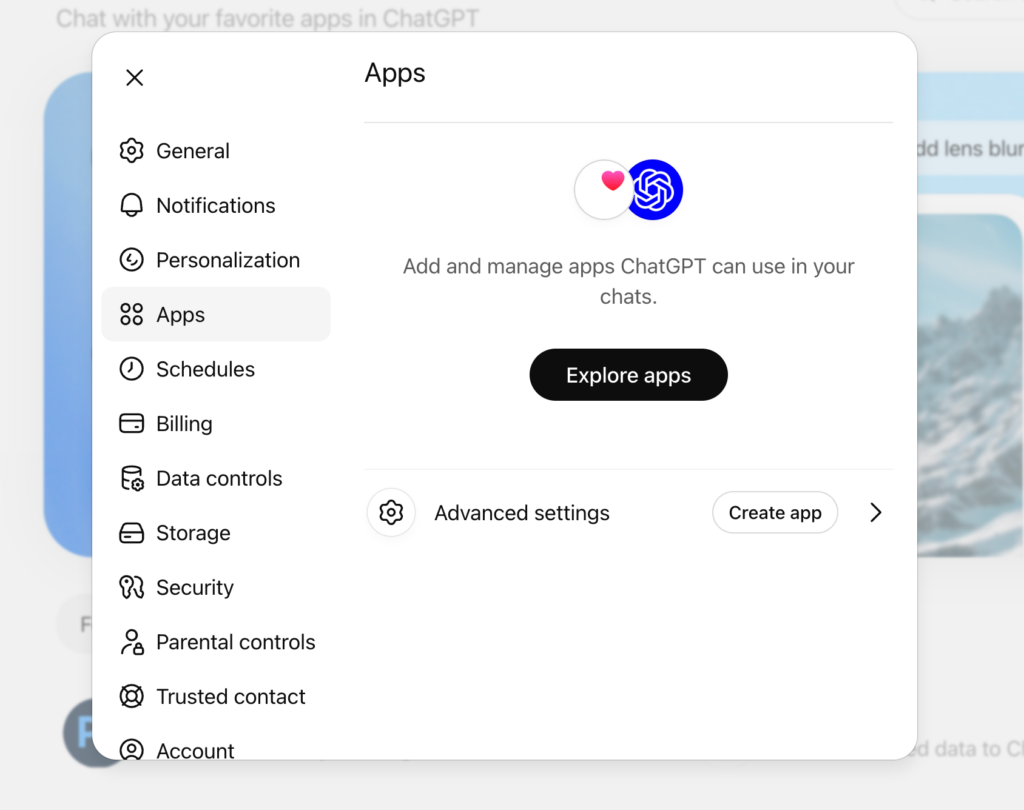
3. Select Custom and enter the URL: https://mcp.lumar.io/mcp
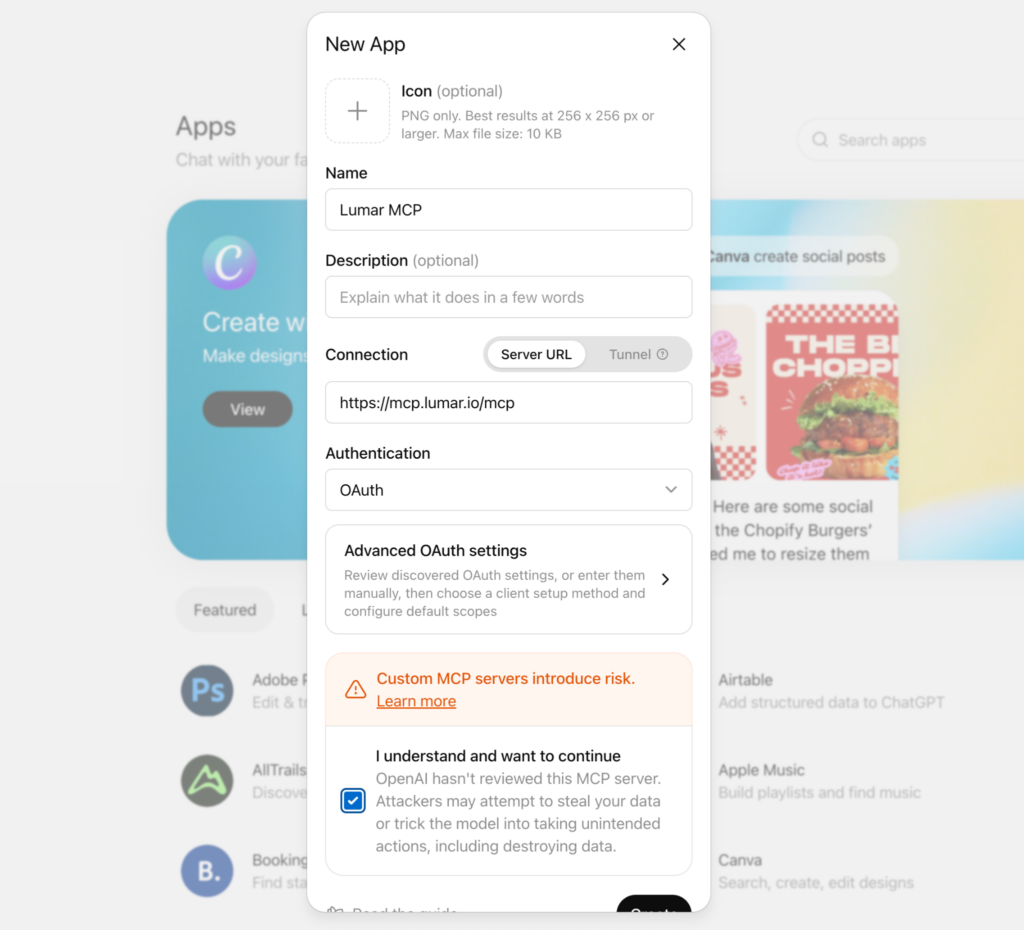
4. Log in to your Lumar account when prompted.
Once connected, the Lumar app appears in your tools list. Select it at the start of a conversation to activate it.
Enterprise and Education plans: Admins manage connector setup via the workspace settings. Contact your ChatGPT workspace admin to request the Lumar connector be added.
Cursor
Plans: MCP is available on all Cursor plans.
- Open Cursor and press Cmd+, (Mac) or Ctrl+, (Windows) to open settings.
- Navigate to Tools & MCPs → MCP in the sidebar.
- Click + Add New MCP Server.
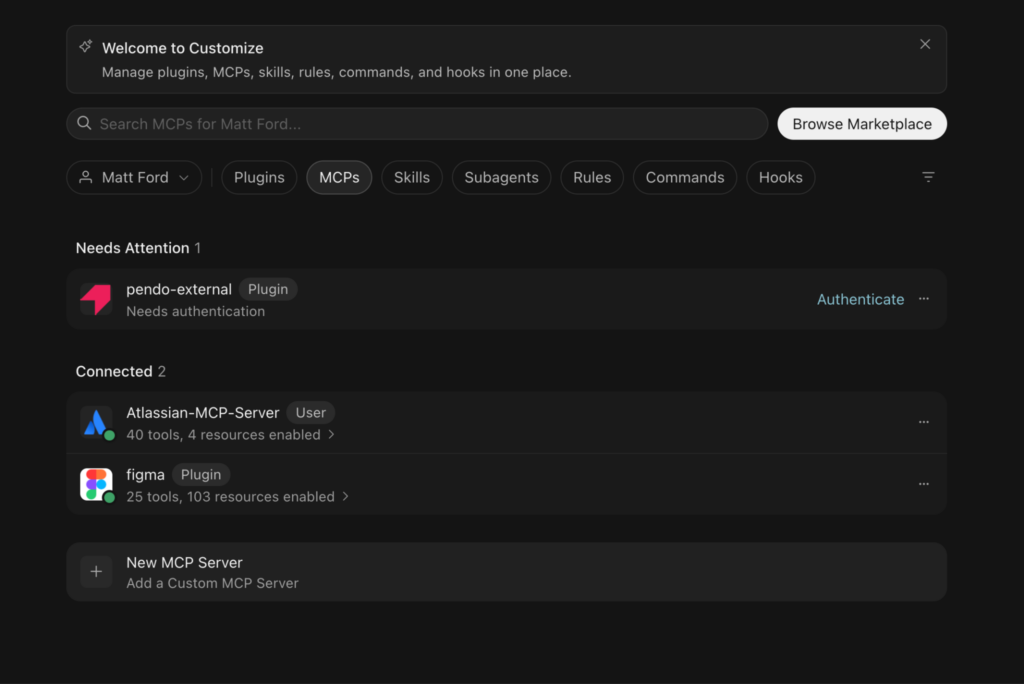
4. Fill in the dialog:
- Name: Lumar
- Type: “http”
- URL: https://mcp.lumar.io/mcp
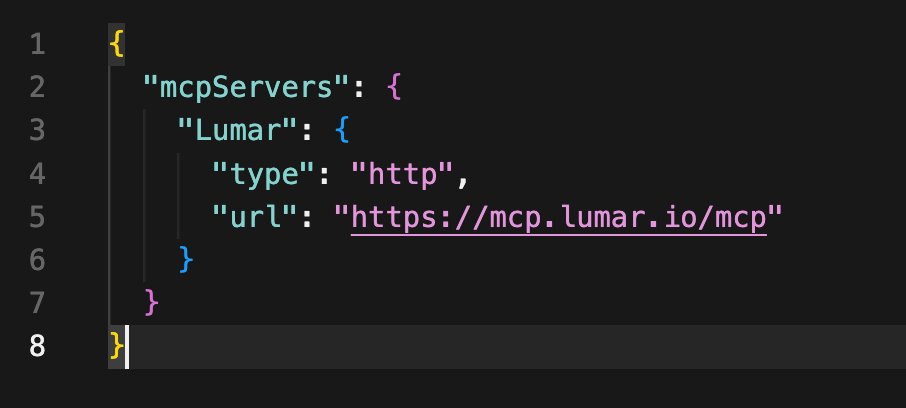
5. Click Save. You will be prompted to authenticate the MCP server — a green dot next to the server name confirms it’s running.
6. A browser window will open for you to log in to your Lumar account and authorise the connection.
To verify it’s working, open a new Composer session in Agent mode and ask: “What Lumar tools do you have access to?”
Other MCP-compatible tools
The Lumar MCP server uses the standard Streamable HTTP transport, so it works with any MCP-compatible tool. In all cases the server URL is: https://mcp.lumar.io/mcp
Look for the option to add a remote MCP server or custom connector in your tool’s settings. Enter the URL above, then authenticate the connection with your Lumar account when prompted.
If you’re unsure where to find your connector settings, check your tool’s documentation.
Important things to know
Connect at your own risk — and check your AI provider’s data policy first.
When you connect the Lumar MCP server, your crawl data passes through your chosen AI assistant to answer your questions. Depending on that provider’s terms, your data may be used to train their AI models. Lumar can’t control how a third-party AI platform handles data once it leaves our server.
Before connecting, only use an account and plan where the provider explicitly states your data won’t be used for training. This is typically the case on paid business, team, and enterprise tiers — but not always on free or individual plans. Check your provider’s data and privacy policy, and if you’re on a company account, clear it with your security or data team first.
Your Lumar permissions still apply. You authenticate by logging into your own Lumar account, so the connection only ever accesses data you’re already permitted to see.
Some actions make changes. Creating tasks, triggering crawls, and managing segments are write operations. Your assistant shows you what it’s about to do before acting — review before confirming.
Results reflect your latest crawl. The server queries live data. If a crawl is in progress, some reports may be incomplete until it finishes.
Troubleshooting
The Lumar tools aren’t showing up
Check the server URL is entered exactly as https://mcp.lumar.io/mcp, and that you completed the login step when prompted. Some assistants need a restart after adding a connector.
I’m getting authentication errors
Your session may have expired. Remove the connector and add it again, logging into your Lumar account when prompted.
The assistant can’t find a project
Use the project’s full name as it appears in Lumar, or ask it to list your projects first: “What Lumar projects do I have access to?”
Responses are slow
Large exports and AI Visibility trend analysis can take a few seconds. That’s normal for data-heavy requests.
What’s next
- Lumar Analyze overview
- AI Visibility: how scoring works
- Lumar API reference
Have feedback on this article? Use the thumbs up/down below or contact support.